- Published on
Building Secure Approval Workflows with Microsoft Agent Framework and AG-UI
Tools are the hands of the AI agent, enabling it to perform actions beyond generating text. There are tools for querying databases, calling APIs, sending emails, and a host of other capabilities.
Tools may sometimes perform actions that change system state or need access to sensitive data. This is where it is critical to stay in control to ensure security and compliance.
In this post, we'll explore how to build secure approval workflows using Microsoft Agent Framework (MAF) and AG-UI, ensuring that critical actions require explicit user consent before execution.
💡 Source Code: You can find the full working implementation of the example discussed in this post in the GitHub repository: maf-approval-workflow
The Problem: Unrestricted Tool Access
While some tools are safe to call automatically, others perform sensitive operations that should not be executed without user consent. Below are examples of such sensitive operations:
- Data Modification: Require approval before updating or deleting records
- External API Calls: Get user consent before calling third-party APIs
- Accessing Sensitive Data: Confirm before retrieving and sharing sensitive information with external systems
The user must be notified when such actions are about to be taken, and they should have the ability to approve or reject these actions before they are executed.
The agent and the client application must work together to facilitate this approval workflow seamlessly. This includes streaming the approval request to the client, displaying the approval UI to the user, and capturing the user's decision.
The agent must gracefully handle the approval process, pausing execution until a decision is made.
Scenario: Bike Store Assistant
To illustrate the approval workflow, let's consider a bike store assistant scenario. The AI agent helps users browse a bike catalog, check inventory, and process payments for bike purchases. The agent has access to several tools to perform these operations.
getAvailableBikesTool: Retrieve available bikesgetBikeDetailsTool: Retrieve detailed information about a specific bikecalculatePriceTool: Calculate the total price including taxes and discountsprocessPaymentTool: Process customer payments for bike purchases
The first three tools are read-only operations that do not change any state. The agent can call these tools automatically to provide information to the user. However, the processPaymentTool is different. It performs a critical operation that requires handling sensitive financial data and should never be executed without user confirmation.
The following section highlights only the important parts of the implementation related to the approval workflow. You can find the complete code in the GitHub repository
Building the Server with Microsoft Agent Framework
The Agent can be hosted in an ASP.NET Core application using Microsoft Agent Framework. Below is the setup for the server application.
The server configures the chat client, which provides access to the language model. The chat client supports any model provider, but in this example, we are using GitHub Models.
The helper method CustomerServiceAssistant.CreateAsync creates the agent with all its tools, including the approval-required payment tool. We will look at the implementation of this method shortly.
The agent is then mapped to an AG-UI endpoint, which handles all the streaming and communication with the client application.
using Microsoft.AspNetCore.Builder;
using Microsoft.Extensions.AI;
using Microsoft.Agents.AI;
using Microsoft.Agents.AI.Hosting.AGUI.AspNetCore;
using OpenAI;
using System.ClientModel;

var builder = WebApplication.CreateBuilder(args);

// Set up the chat client (using GitHub Models in this example)
var githubToken = builder.Configuration["GITHUB_TOKEN"]
                  ?? Environment.GetEnvironmentVariable("GITHUB_TOKEN");
var githubModelsBaseUrl = "https://models.inference.ai.azure.com";
var githubModelId = "gpt-4o";

var clientOptions = new OpenAIClientOptions
{
    Endpoint = new Uri(githubModelsBaseUrl)
};
var openAiClient = new OpenAIClient(
    new ApiKeyCredential(githubToken),
    clientOptions);

IChatClient chatClient = openAiClient.GetChatClient(githubModelId)
    .AsIChatClient()
    .AsBuilder()
    .Build();

builder.Services.AddChatClient(chatClient);
builder.Services.AddAGUI();

// Create the agent with tools
var customerServiceAssistant = await CustomerServiceAssistant.CreateAsync(
    chatClient,
    appConfig,
    jsonOptions);

builder.Services.AddKeyedSingleton<AIAgent>(
    "CustomerServiceAssistant",
    customerServiceAssistant);

var app = builder.Build();

app.UseCors();

// Map AGUI endpoint - this handles all the streaming and approval workflow
app.MapAGUI("/agent/customer_service_assistant", customerServiceAssistant);

await app.RunAsync();
Creating the Customer Service Assistant Agent
Now let's look at how the CustomerServiceAssistant is implemented with all its tools. An agent has 3 main components: instructions, tools, and access to a chat client (language model).
ServerFunctionApprovalAgent is a wrapper agent that handles the approval protocol, automatically intercepting approval-required tools and managing the approval workflow.
using ContosoBikestore.Agent.Host.Tools;
using Microsoft.Agents.AI;
using Microsoft.Extensions.AI;

namespace ContosoBikestore.Agent.Host.Agents;

public static class CustomerServiceAssistant
{
    public static async Task<AIAgent> CreateAsync(IChatClient chatClient, AppConfig appConfig,
        Microsoft.AspNetCore.Http.Json.JsonOptions jsonOptions)
    {
        var getAvailableBikesTool = AIFunctionFactory.Create(
            ProductInventoryTools.GetAvailableBikes);

        var getBikeDetailsTool = AIFunctionFactory.Create(
            ProductInventoryTools.GetBikeDetails);

        var calculatePriceTool = AIFunctionFactory.Create((decimal price, int quantity) =>
        {
            var subtotal = price * quantity;
            var tax = subtotal * 0.08m;
            var total = subtotal + tax;
            return $"{{\"quantity\": {quantity}, \"subtotal\": {subtotal:F2}, \"tax\": {tax:F2}, \"total\": {total:F2}}}";
        }, "CalculatePrice", "Calculate the total price including tax for a bike purchase.");

        var processPaymentFunction = AIFunctionFactory.Create(
            (int bikeId, decimal amount) =>
            {
                return "Processed Payment";
            },
            "ProcessPayment",
            "Process the payment and submit the order.");

#pragma warning disable MEAI001
        var processPaymentTool = new ApprovalRequiredAIFunction(processPaymentFunction);
#pragma warning restore MEAI001

        var baseAgent = new ChatClientAgent(
            chatClient,
            instructions: """
            You are the Customer Service Assistant for Contoso Bike Store.

            You have access to:
            - GetAvailableBikes: List all bikes in the catalog
            - GetBikeDetails: Look up bike information by name or ID (returns bikeId, name, price, etc.)
            - CalculatePrice: Calculate total price including tax (requires bike price and quantity)
            - ProcessPayment: Process payment and submit order (requires bikeId and amount)

            Help customers with:
            - Price calculations and quotes
            - Complete purchases with approval workflow
            - Billing inquiries and cost breakdowns

            CRITICAL - Purchase Flow:
            1. When customer asks for price or wants to buy a bike by name:
               - Call GetBikeDetails with the bike name to get bikeId and price
               - Example: Customer says "Mountain Explorer Pro" → GetBikeDetails("Mountain Explorer Pro") → get bikeId and price

            2. Calculate the total price:
               - Call CalculatePrice(price, quantity) to get subtotal, tax, and total

            3. Process payment:
               - Call ProcessPayment(bikeId, amount)
               - This will AUTOMATICALLY trigger an approval prompt in AG-UI
               - The system will wait for customer approval before processing
               - If approved, payment processes and order is submitted
               - If rejected, the operation is cancelled

            """,
            name: "CustomerServiceAssistant",
            description: "Customer service assistant for product info, pricing, and purchase approval workflow",
                    tools: [getAvailableBikesTool, getBikeDetailsTool, calculatePriceTool, processPaymentTool]);

        return new ServerFunctionApprovalAgent(baseAgent, jsonOptions.SerializerOptions);
    }
}
Securing Tool Calls using ApprovalRequiredAIFunction
Microsoft Agent Framework provides a flexible way to secure tool access through approval workflows. Instead of allowing the agent to execute any tool call automatically, you can mark specific tools as requiring approval.
Here's how you define a tool that requires approval:
// First, create your tool function
var processPaymentFunction = AIFunctionFactory.Create(
    (int bikeId, decimal amount) =>
    {
        // Payment processing logic here
        return "Payment processed successfully";
    },
    "ProcessPayment",
    "Process the payment and submit the order.");

// Wrap it with ApprovalRequiredAIFunction to require approval
var processPaymentTool = new ApprovalRequiredAIFunction(processPaymentFunction);
The function is a mock payment processing function that simulates handling a payment transaction. The ApprovalRequiredAIFunction wrapper tells the framework that this tool cannot be executed without user consent.
When the agent decides to call this tool, the framework will intercept the call and request approval before proceeding. Only after receiving explicit approval from the user will the tool be executed.
Handling Approval Requests in the Client Application
The tool call approval request is initiated by returning a response that indicates that approval is required. The client application must understand this response and display the appropriate UI to the user.
The client application must then capture the user's decision and send it back to the server to continue execution.
Why Traditional Request/Response Doesn't Work for Agentic Apps
In traditional web applications, the interaction model is simple: a client makes a request, the server processes it and returns data, the client renders it, and the interaction ends.
If you've worked with applications like GitHub Copilot, you have seen agents working behind the scenes. These agents aren't just returning a final answer, but they exhibit behaviors that require a different communication model:
- Agents stream partial responses, reasoning steps, and progress updates in real time, so users can see what's happening as it unfolds.
- Agents may need to ask follow-up questions or request additional input from users mid-conversation.
- Agents can influence the UI itself, opening panels, triggering dialogs, or highlighting options based on context.
- Agents need to maintain shared state with the client across multiple turns, remembering past interactions and ongoing tasks.
Why AG-UI? Building Interactive Agent Interfaces
This is exactly the problem AG-UI (Agentic UI) is designed to solve. AG-UI is a protocol that standardizes how agent state, UI intents, and user interactions flow between your model/agent runtime and user-facing frontend applications.
Instead of a single response, the agent can send events — messages, UI updates, tool requests, or approval prompts. The client can react to them in real time. AG-UI bridges the gap between autonomous agents and human-friendly user interfaces, making agentic applications feel natural and responsive, especially when humans are part of the loop.
While you can write custom code to handle streaming, tool call interception, approval UI, and response handling, it quickly becomes cumbersome. The CopilotKit AG-UI library provides React components that make it easy to build agent interfaces that support approval workflows out of the box.
Client Implementation with AG-UI
Now let's look at the client-side implementation using CopilotKit's AG-UI React components. The client application consists of three main parts:
- Chat Interface: Main chat component that handles user interactions and approval hooks
- CopilotKit Provider: Wraps the chat interface and connects to the server endpoint
- Approval UI Component: Displays the approval dialog when payment authorization is required
'use client'

import React, { useState } from 'react'
import '@copilotkit/react-ui/styles.css'
import { CopilotKit, useCopilotReadable, useHumanInTheLoop } from '@copilotkit/react-core'
import { CopilotChat } from '@copilotkit/react-ui'

export default function Page() {
  return (
    <CopilotKit runtimeUrl="/api/copilotkit" showDevConsole={false} agent="contoso_agent">
      <Chat />
    </CopilotKit>
  )
}

/**
 * Enhanced Approve / Reject UI with accessibility and loading states
 */
const ApprovalUI = ({
  args,
  respond,
  status,
}: {
  args: { bikeId?: number; amount?: number; approvalId?: string }
  respond?: (value: any) => void
  status: string
}) => {
  const [isResponding, setIsResponding] = useState(false)

  // Only show when executing and respond function is available
  if (status !== 'executing' || !respond) return null

  const handleRespond = async (approved: boolean) => {
    setIsResponding(true)
    // Return response object with approval_id and approved fields
    respond({
      approval_id: args.approvalId,
      approved: approved,
    })
  }

  const handleKeyDown = (e: React.KeyboardEvent) => {
    // Prevent keyboard shortcuts if already responding
    if (isResponding) return

    if (e.key === 'Escape') {
      e.preventDefault()
      handleRespond(false)
    } else if (e.key === 'Enter') {
      e.preventDefault()
      handleRespond(true)
    }
  }

  const formattedAmount = args?.amount?.toFixed(2) || '0.00'

  return (
    <div
      className="fixed inset-0 z-50 flex items-center justify-center bg-black/50 p-4"
      role="dialog"
      aria-labelledby="approval-title"
      aria-describedby="approval-message"
      onKeyDown={handleKeyDown}
      tabIndex={-1}
    >
      <div className="animate-fadeIn w-full max-w-md rounded-xl border bg-white p-6 shadow-lg dark:bg-gray-800">
        <h3 id="approval-title" className="mb-3 text-lg font-semibold dark:text-white">
          💳 Payment Approval Required
        </h3>
        <div
          id="approval-message"
          className="mb-6 space-y-2 text-sm break-words dark:text-gray-300"
        >
          <p>Please review and approve this payment:</p>
          <div className="space-y-1 rounded-lg bg-gray-50 p-4 dark:bg-gray-700">
            <p>
              <span className="font-medium">Bike ID:</span> {args.bikeId ?? 'N/A'}
            </p>
            <p className="text-lg font-semibold text-green-600 dark:text-green-400">
              Total Amount: ${formattedAmount}
            </p>
          </div>
          <p className="text-xs text-gray-500 dark:text-gray-400">
            Press Enter to approve or Escape to reject
          </p>
        </div>

        <div className="flex justify-end gap-3">
          <button
            className="rounded bg-gray-200 px-4 py-2 transition-colors hover:bg-gray-300 disabled:cursor-not-allowed disabled:opacity-50 dark:bg-gray-700 dark:text-white dark:hover:bg-gray-600"
            onClick={() => handleRespond(false)}
            disabled={isResponding}
            aria-label="Reject action"
          >
            ✗ Reject
          </button>

          <button
            className="rounded bg-green-600 px-4 py-2 text-white transition-colors hover:bg-green-700 disabled:cursor-not-allowed disabled:opacity-50"
            onClick={() => handleRespond(true)}
            disabled={isResponding}
            aria-label="Approve action"
          >
            {isResponding ? 'Processing...' : '✓ Approve Payment'}
          </button>
        </div>
      </div>
    </div>
  )
}

const Chat = () => {
  /**
   * Provide readable context to the agent
   */
  useCopilotReadable({
    description: 'Contoso Bikestore customer',
    value: 'User browsing bikes',
  })

  /**
   * 🔥 Human-in-the-loop approval tool
   * Based on: https://docs.copilotkit.ai/reference/hooks/useHumanInTheLoop
   */
  useHumanInTheLoop({
    name: 'request_approval',
    description: 'Request customer approval before processing payment and submitting order',
    parameters: [
      {
        name: 'request',
        type: 'string',
        description: 'The approval request containing function details',
        required: true,
      },
    ],
    render: ({ args, respond, status }) => {
      // Parse the approval request from the wrapper
      let approvalData: { bikeId?: number; amount?: number; approvalId?: string } = {}

      if (args.request) {
        try {
          const parsed = typeof args.request === 'string' ? JSON.parse(args.request) : args.request
          console.log('Parsed approval request:', parsed)

          // Handle both snake_case (from backend) and PascalCase (legacy)
          const functionArgs = parsed.function_arguments || parsed.FunctionArguments
          const approvalId = parsed.approval_id || parsed.ApprovalId

          if (functionArgs) {
            approvalData = {
              bikeId: functionArgs.bikeId,
              amount: functionArgs.amount,
              approvalId: approvalId,
            }
          }
        } catch (e) {
          console.error('Failed to parse approval request:', e, 'Raw args:', args)
        }
      }

      return <ApprovalUI args={approvalData} respond={respond} status={status} />
    },
  })

  return (
    <div
      className="flex h-screen w-full items-center justify-center bg-gray-50 dark:bg-gray-900"
      data-testid="background-container"
    >
      <div className="h-full w-full rounded-lg md:h-8/10 md:w-8/10">
        <CopilotChat
          className="mx-auto h-full max-w-6xl rounded-2xl"
          labels={{
            title: 'Contoso Bikestore Assistant',
            initial:
              "Welcome to Contoso Bikestore. I'm your personal bike expert assistant.\n\nI can help you:\n• Browse our complete bike catalog\n• Check real-time inventory\n• Get personalized recommendations\n• Learn about bike features and specifications\n\nWhat would you like to know about our bikes today?",
            placeholder: 'Ask about bikes, inventory, or recommendations...',
          }}
          suggestions={[
            {
              title: 'Browse Bikes',
              message: 'Show me all available bikes',
            },
            {
              title: 'Check Price',
              message: 'How much does the Mountain Explorer Pro cost?',
            },
            {
              title: 'Get Recommendation',
              message: 'I want a bike for commuting in the city',
            },
          ]}
        />
      </div>
    </div>
  )
}
The CopilotKit component wraps the entire application and establishes the connection to the AG-UI server endpoint. This provider handles all the streaming communication with the backend server we set up earlier.
<CopilotKit
  runtimeUrl="/api/copilotkit"
  showDevConsole={false}
  agent="contoso_agent"
>
The useHumanInTheLoop hook is where the magic happens. It registers a tool called request_approval that the server can invoke when approval is needed. When the server's ServerFunctionApprovalAgent intercepts a ProcessPayment tool call, it automatically transforms it into a request_approval call that gets streamed to the client. This hook catches that call and renders the approval dialog.
useHumanInTheLoop({
  name: "request_approval",
  description: "Request customer approval before processing payment and submitting order",
  parameters: [...],
  render: ({ args, respond, status }) => {
    // Parse approval data and render UI
    return <ApprovalUI args={approvalData} respond={respond} status={status} />;
  },
});
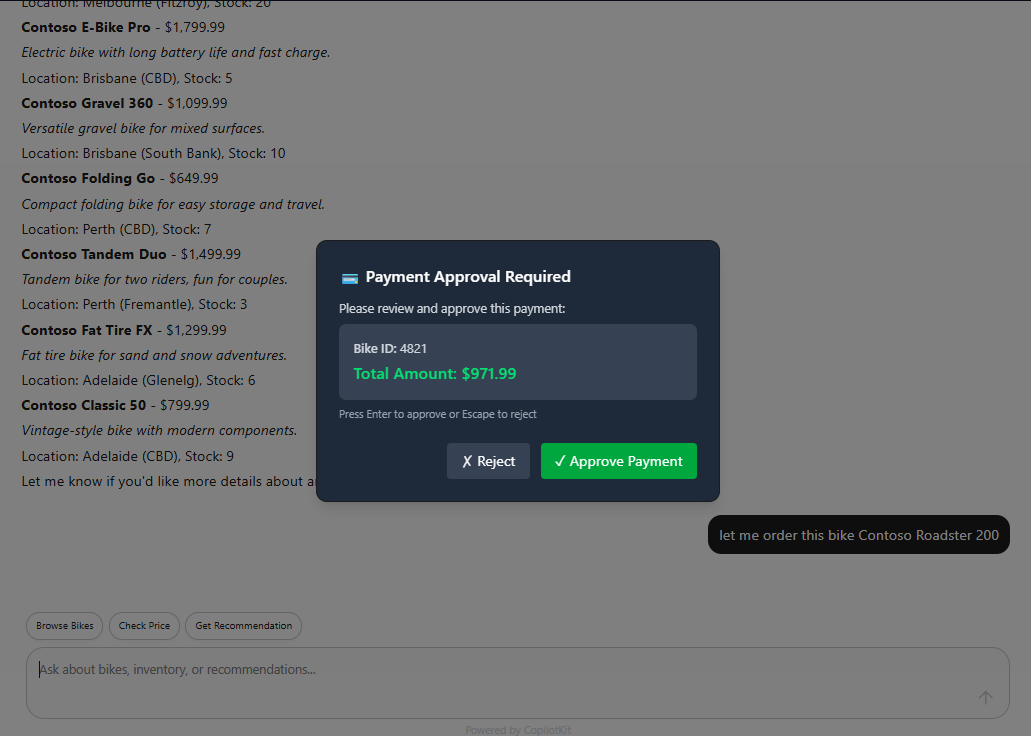
The ApprovalUI component displays a modal dialog with the payment details. When the user clicks "Approve" or "Reject":
The
handleRespondfunction is called with the user's decisionThe response is sent back through the
respondcallback with the format:respond({ approval_id: args.approvalId, approved: true, // or false })This response is streamed back to the server
The server's
ServerFunctionApprovalAgentprocesses the responseIf approved, the
ProcessPaymenttool executes and the result streams back to the clientThe approval dialog closes and the chat continues with the agent's response
Running the Example
Refer to the README in the GitHub repository for detailed instructions on setting up and running the example application locally.
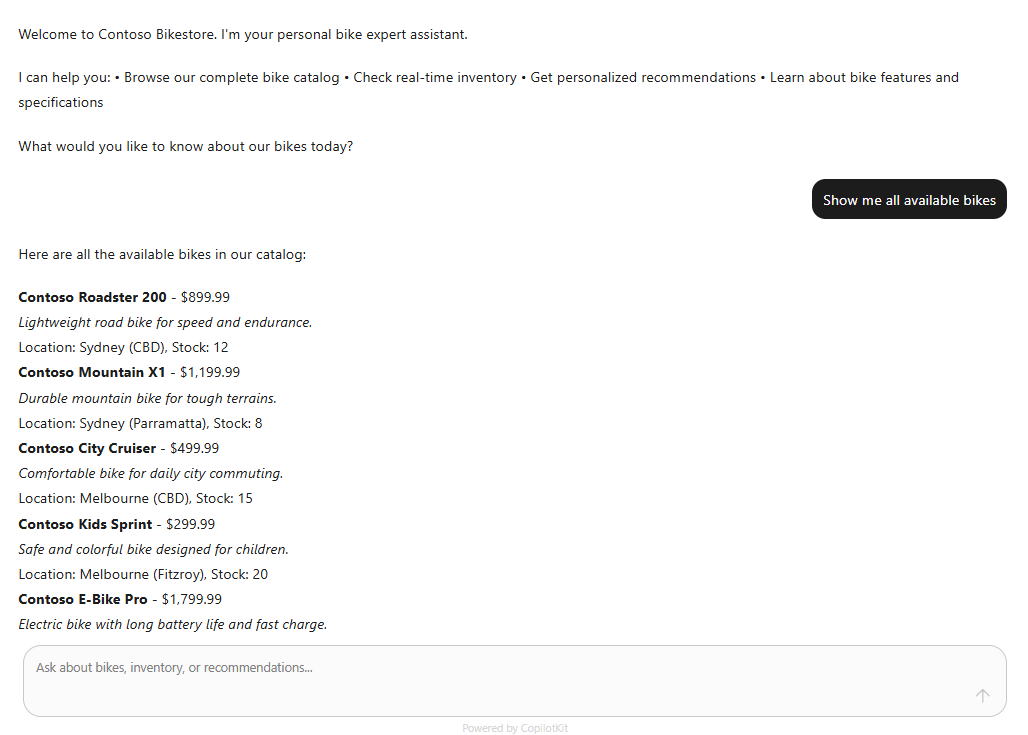
Access the bike store assistant chat interface to browse bikes and get pricing information. Here are some example prompts to try:
- "Show me all available bikes"
- "How much does the Mountain Explorer Pro cost?"
- "I want a bike for commuting in the city"
When you decide to purchase a bike, the agent will calculate the total price and prompt you for payment approval. The approval dialog will appear, displaying the bike ID and total amount. You can approve or reject the payment. The user's decision will be processed by the agent accordingly.