- Published on
Building MCP Servers with GitHub Copilot
While tools extend GenAI application capabilities by allowing models to call external functions they are typically scoped to a specific model or framework. MCP solves this by providing a standard interface that simplifies integration across models and tools.
In this post, we will see how easy it is to set up a local MCP server and interact with it directly from GitHub Copilot Chat in VS Code.
We discussed how the tool calls are executed in my previous post Integrating external tools with Large Language Models.
Your AI application orchestrates the tool call using frameworks like LangChain, Semantic Kernel, or Azure AI Agent Service. The tool call orchestration will vary based on the the model and the tooling interface. This means if you switch to a different model you need to rework the tool call orchestration.
If you have M models and N tools, you end up with M x N integrations to maintain. And more code means more maintenance, and probably more complexity. This is known as the M x N integration problem.
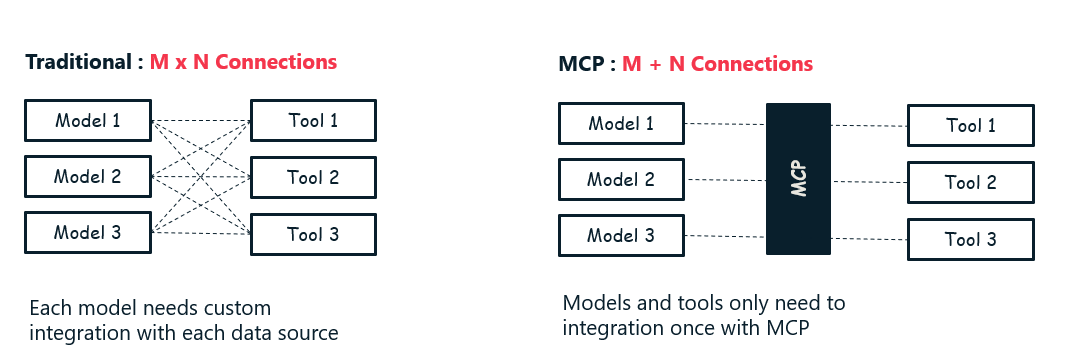
MCP (Model Context Protocol) solves this by providing a standard interface for tools that all models can connect to. And hence, you only need M + N connections.
MCP Architecture
There are three main participants in the MCP architecture.
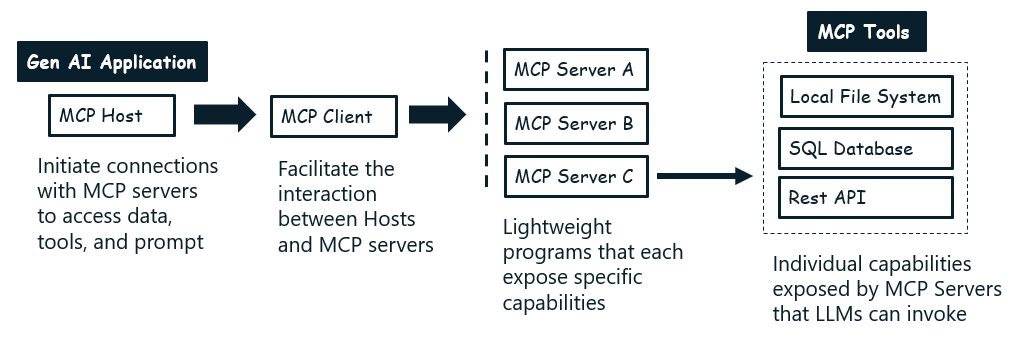
MCP Host: The application that interacts with the MCP Server. This is the AI application you are building, and it is responsible for managing the communication with the MCP Server.
MCP Client: A component that maintains a connection to an MCP server and obtains context from an MCP server for the MCP host to use. It acts as a bridge, handling the details of the protocol and data exchange.
MCP Server: The server that implements the MCP interface and provides access to the tools and data sources. It is responsible for executing the tools, serving resources, and returning results to the MCP Host.
MCP servers can expose three types of capabilities:
- Resources: Data that can be read by clients, such as files, database records, or API responses.
- Tools: Functions that can be called by the LLM, enabling actions like querying a database, sending an email, or running a script.
- Prompts: Pre-written templates that help accomplish specific tasks, making it easier to standardize and reuse prompt engineering patterns.
How MCP Works: Execution Flow
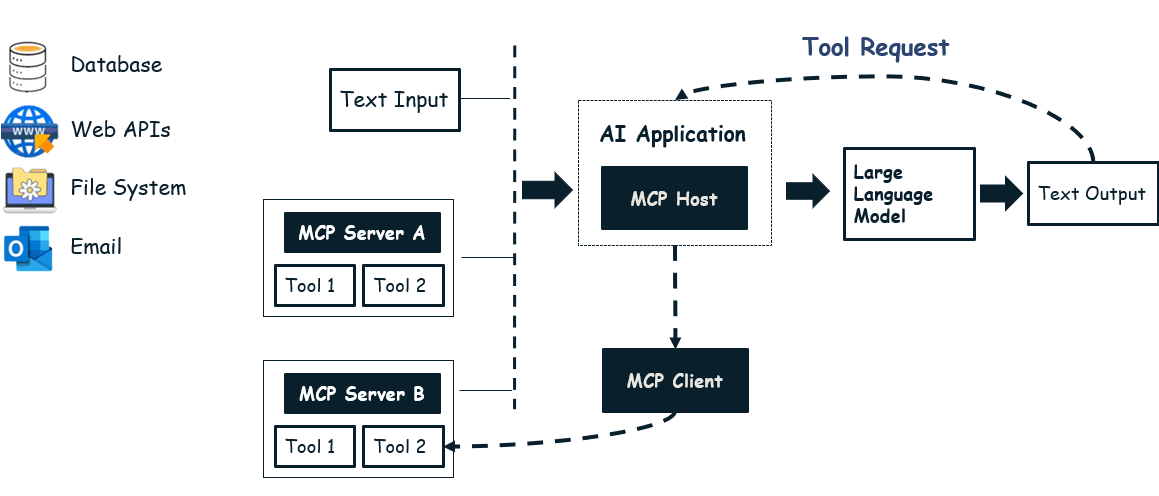
Tool Definition in Model Context: The LLM is provided with a list of available tools (capabilities) exposed by MCP servers, typically via a manifest or API schema. This allows the LLM to understand what functions or data are accessible.
User Input and Model Reasoning: When a user submits a prompt, the LLM analyzes the request and determines if it needs to invoke an external tool (such as a function, API, or data source) to fulfill the task.
Tool Invocation Request: The LLM generates a tool invocation request, specifying the tool name and required parameters. This request is sent to the MCP Host (your application).
MCP Host and Client Mediation: The MCP Host receives the request and uses the MCP Client to communicate with the appropriate MCP Server. The MCP Client handles the protocol, connection, and data formatting.
MCP Server Execution: The MCP Server receives the request, executes the specified tool or function, and returns the result to the MCP Client.
Result Propagation: The MCP Client passes the result back to the MCP Host, which then provides it to the LLM.
LLM Response Generation: The LLM incorporates the tool’s output into its final response to the user.
The steps are similar to a function calling pattern, where the LLM acts as the caller, and the application orchestrates the execution of the tool and returns the results to the LLM.
The key difference is that MCP provides a standardized protocol and abstraction layer, allowing any LLM to interact with any MCP-compliant tool or server without needing custom integration code for each combination.
Another highlight is that tools themselves can also be implemented as MCP servers. This means you can chain tools together or connect multiple MCP servers to handle bigger workflows — all triggered by a single call from the model.
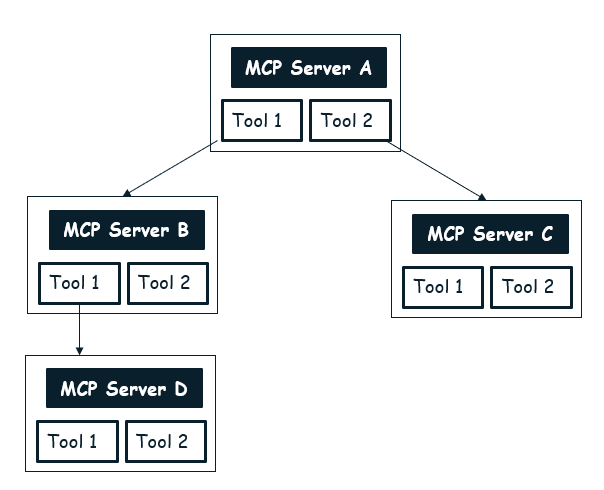
For example:
Consider a MCP server that generates reports from a database. This server could use another MCP server that provides access to the database tools for different databases.
When the report generation server needs to query data, it can call the database MCP server to fetch the required information. This allows you to build modular, reusable components that can be combined in various ways to create complex workflows.
Building MCP Server
In this section, we'll explore how to build a custom MCP server using C# and the Model Context Protocol SDK. The MCP Server we will build is a Contoso Bikestore example that provides a set of tools to interact with a bike store.
The source code for this example is available in the GitHub repository Contoso Store MCP Server.
The MCP server will expose the following tools:
- GetAvailableBikes - Get all available bikes from the store
- GetBikeById - Get details for a specific bike by its ID
- CreateBikeOrder - Create a new bike order
- GetOrderById - Get order details by order ID
Here is the implementation of the BikeStoreTools class that defines the tools our MCP server will expose:
- The
[McpServerToolType]attribute marks this class as containing MCP tools. - Individual methods are marked with
[McpServerTool]to expose them as callable tools. - The
[Description]attributes provide information about the tool and its parameters, which will be visible to the LLM. - The return type is serialized and sent back to the caller.
In this example, we are using hardcoded data to simulate a bike store. In a real-world scenario, you would connect to a database or an external API to transact with real data.
using System.ComponentModel;
using System.Text.Json;
using System.Collections.Generic;
using ModelContextProtocol.Server;

namespace ContosoBikestore.MCPServer.Tools;

// This is a simplified version with hardcoded data for demo purposes
// In a real-world scenario, you would connect to a database or API
[McpServerToolType]
public sealed class BikeStoreTools
{
    // Sample hardcoded data
    private static readonly Dictionary<int, BikeInfo> BikeDatabase = new()
    {
        [1] = new BikeInfo {
            Id = 1,
            Model = "Mountain Explorer",
            Price = 1299.99m,
            Category = "Mountain",
            InStock = true
        },
        [2] = new BikeInfo {
            Id = 2,
            Model = "Road Master",
            Price = 1599.99m,
            Category = "Road",
            InStock = true
        },
        [3] = new BikeInfo {
            Id = 3,
            Model = "City Cruiser",
            Price = 899.99m,
            Category = "Urban",
            InStock = false
        }
    };

    private static readonly Dictionary<string, OrderInfo> OrderDatabase = new();

    [McpServerTool, Description("Get all available bikes from the Contoso bike store.")]
    public static Task<string> GetAvailableBikes(HttpClient client)
    {
        var result = JsonSerializer.Serialize(BikeDatabase.Values, new JsonSerializerOptions
        {
            WriteIndented = true
        });

        return Task.FromResult(result);
    }

    [McpServerTool, Description("Get details for a specific bike by its ID.")]
    public static Task<string> GetBikeById(
        HttpClient client,
        [Description("The ID of the bike to retrieve")] int bikeId)
    {
        // In a real application, you might use:
        // var bike = await dbContext.Bikes.FindAsync(bikeId);

        if (!BikeDatabase.TryGetValue(bikeId, out var bike))
        {
            return Task.FromResult($"Bike with ID {bikeId} not found.");
        }

        var result = JsonSerializer.Serialize(bike, new JsonSerializerOptions
        {
            WriteIndented = true
        });

        return Task.FromResult(result);
    }

    [McpServerTool, Description("Create a new bike order.")]
    public static Task<string> CreateBikeOrder(
        HttpClient client,
        [Description("The ID of the bike to order")] int bikeId,
        [Description("Customer's full name")] string customerName,
        [Description("Customer's email address")] string customerEmail,
        [Description("Shipping address for the order")] string shippingAddress)
    {
        if (!BikeDatabase.TryGetValue(bikeId, out var bike))
        {
            return Task.FromResult($"Cannot create order: Bike with ID {bikeId} not found.");
        }

        if (!bike.InStock)
        {
            return Task.FromResult($"Cannot create order: Bike {bike.Model} is out of stock.");
        }

        // Generate a random order ID (in real app, this would be from DB)
        var orderId = $"ORD-{DateTime.UtcNow.Ticks % 10000}";

        var order = new OrderInfo
        {
            OrderId = orderId,
            BikeId = bikeId,
            BikeModel = bike.Model,
            CustomerName = customerName,
            CustomerEmail = customerEmail,
            ShippingAddress = shippingAddress,
            OrderDate = DateTime.UtcNow,
            Status = "Processing"
        };

        // Store in our mock database
        OrderDatabase[orderId] = order;

        var result = JsonSerializer.Serialize(order, new JsonSerializerOptions
        {
            WriteIndented = true
        });

        return Task.FromResult(result);
    }

    [McpServerTool, Description("Get order details by order ID.")]
    public static Task<string> GetOrderById(
        HttpClient client,
        [Description("The order ID to retrieve")] string orderId)
    {
        if (!OrderDatabase.TryGetValue(orderId, out var order))
        {
            return Task.FromResult($"Order with ID {orderId} not found.");
        }

        var result = JsonSerializer.Serialize(order, new JsonSerializerOptions
        {
            WriteIndented = true
        });

        return Task.FromResult(result);
    }

    // Data models that would typically be in separate files
    private class BikeInfo
    {
        public int Id { get; set; }
        public string Model { get; set; } = "";
        public decimal Price { get; set; }
        public string Category { get; set; } = "";
        public bool InStock { get; set; }
    }

    private class OrderInfo
    {
        public string OrderId { get; set; } = "";
        public int BikeId { get; set; }
        public string BikeModel { get; set; } = "";
        public string CustomerName { get; set; } = "";
        public string CustomerEmail { get; set; } = "";
        public string ShippingAddress { get; set; } = "";
        public DateTime OrderDate { get; set; }
        public string Status { get; set; } = "";
    }
}
This Program.cs file registers the MCP server, configures it to communicate via standard input/output (which works well with VS Code), and registers our BikeStoreTools class.
using Microsoft.Extensions.DependencyInjection;
using Microsoft.Extensions.Hosting;
using Microsoft.Extensions.Logging;
using ContosoBikestore.MCPServer.Tools;

var builder = Host.CreateApplicationBuilder(args);

// Configure all logs to go to stderr (stdout is used for the MCP protocol messages)
builder.Logging.AddConsole(o => o.LogToStandardErrorThreshold = LogLevel.Trace);

builder.Services.AddMcpServer()
    .WithStdioServerTransport()
    .WithTools<BikeStoreTools>();

builder.Logging.AddConsole(options =>
{
    options.LogToStandardErrorThreshold = LogLevel.Trace;
});

await builder.Build().RunAsync();
Testing the MCP Server
You can host and use the MCP server you built to power your AI applications. To test it locally, let's use Visual Studio Code with the GitHub Copilot extension, which has built-in support for MCP.
Clone the GitHub repository Contoso Store MCP Server.
Ensure you have GitHub Copilot installed in VS Code. The recent versions of VS Code with GitHub Copilot support MCP servers natively, so no additional MCP-specific extension is required.
In your workspace, create a
.vscodefolder if it doesn't already exist.Inside the
.vscodefolder, create a new file namedmcp.json.Add your MCP server configuration to the
mcp.jsonfile:{ "servers": { "ContosoBikestore": { "type": "stdio", "command": "dotnet", "args": ["run", "--project", "ContosoBikestore.MCPServer"] } } }Navigate to
mcp.jsonfile and start the server by clicking the "Start Server" button in the editor.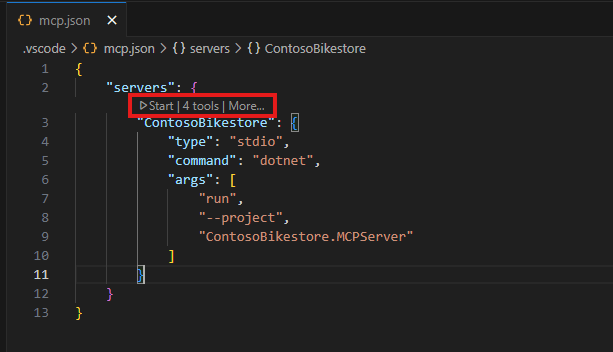
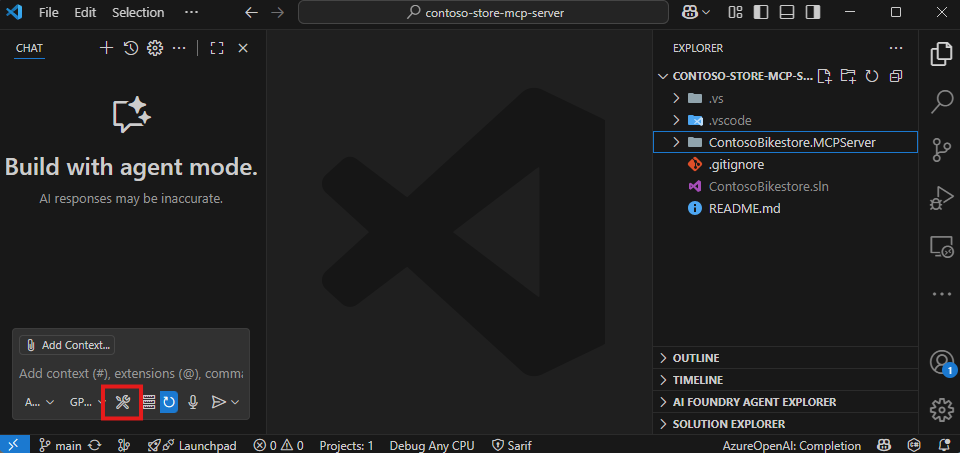
Open GitHub Copilot Chat and enable Agent Mode. Click on the tool icon in the chat input box.
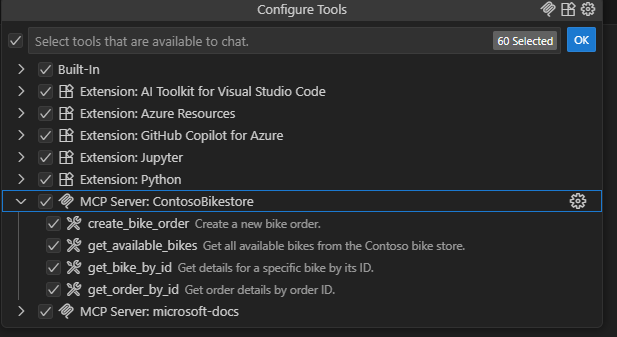
Select "Contoso Bikestore" from the available tools.
You can now interact with your MCP server through the chat interface:
In the MCP chat, try queries like:
- "What bikes are available in Contoso bike store ?"
- "What is the price of Mountain Explorer bike ?"
- "I want to order the Road Master bike. Create an order for me."
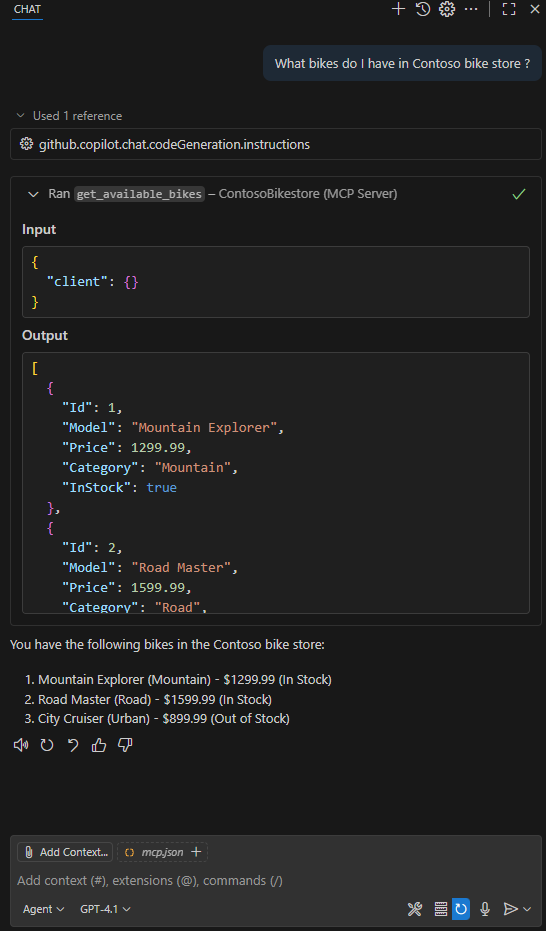
When you ask a question, GitHub Copilot will use the MCP protocol to call the appropriate tool on your MCP server and return the results in the chat. You can also view the execution details and the raw requests/responses for debugging.
Learn More
For more details about MCP, check out these popular blogs and resources:
Conclusion
MCP adds significant value by simplifying and scaling how AI applications connect with external tools and data sources:
MCP provides a growing catalog of ready-to-use integrations that your AI application can connect to directly. This reduces setup time and complexity, allowing you to quickly add new capabilities or swap out tools with minimal code changes.
For a list of available servers, see Model Context Protocol servers.
With MCP, you not only extend your AI application but also give it a robust, future-proof foundation to grow with.